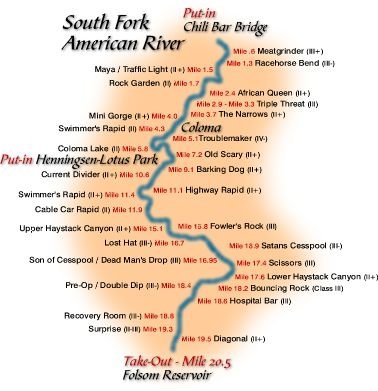
Map of the South Fork
Season: April – September
Stretch: Chili Bar to Folsom Lake
Difficulty: Class III+ with one IV-
Distance: 21 miles, 1 or 2 days
Flows: 800 – 1800 CFS, measured as release from Chili Bar dam (CBR)
Gradient: 23 fpm average (upper 31 fpm, lower 21 fpm) pool and drop
Put-in: Chili Bar Bridge – 940 Foot Elevation
Take-out: Folsom Lake near Salmon Falls Bridge – 440 Foot Elevation
Shuttle: 20 minutes AWE to Chili Bar. 30 minutes Salmon Falls to AWE
The American River's South Fork is California's standard beginner to intermediate whitewater run that many rafters run repeatedly and never outgrow. The whitewater is mostly class II+ with ten class III's, two class III+ rapids, and one class IV. There are lots of fun but not life-threatening rapids on this river, which can be run almost any day of the April thru September Season (you'll need a wetsuit in the Spring).
Although the length of 21 miles sounds long, it can be rafted easily in one long day and it makes for one of the most popular two-day trips in the US.
Read below and take a VIRTUAL RIDE rafting down the South Fork American River…
Mile 0
Put in under the Chili Bar bridge. Chili Bar Hole provides fun raft surfing at levels around 1500 CFS. Large pools below in case you fall out of the raft having too much fun. Downstream are several easy rapids, two involving large rocks. A trail follows an old mining road on the right bank.
Mile .6
Meat Grinder Rapid (class III+). A small diversion canal removes water on the left, and a large rock is visible there, just left of center. This is a long rapid (over 1/4 mile) that does require paddling to get a raft through successfully. At some flows, the lead-in rapid can be run either left or far right. Either way, you need to maneuver back to the center, entering the main rapid about 10 meters from the large rock, slanting left-to-right thru a slot between submerged rocks. This is an easy move, but failing to make it can have severe consequences, because the biggest waves and holes are still ahead. After this, keep the raft into the waves as the current funnels you towards Rhino rock on the right. After Rhino rock, wave size decreases, and you can eddy out on the left, or finish the rapid along the right.
Mile 1.3
Racehorse Bend Rapid (class III-). The river curves left among boulders, then runs into an up tilted slate cliff on the right, with submerged rocks along the cliff. Paddle hard and in time as the safest exit is towards center. Big eddy below on the left to swim and play in.
Mile 1.5
Maya Rapid (class II+). Choose either a small hole on the right, or a ledge drop on the left. Big but easily avoidable holes at higher water (class III above 3500 CFS). Maya is a popular kayak surfing spot, often with long lines and a fun wet hit in a raft.
Mile 1.7
Rock Garden (class II). A maze of small boulders that need good paddling and boat control. At lowest flows (under 900 CFS) it is best run on the far left, but most of the time you can go anywhere for a fun ride.
Mile 2.4
African Queen (class II+). Several willow-covered islands create a multiplicity of routes. The most common is right almost all the way, cutting left to avoid a shallow-trap at the end of that channel. This route passes some nice big waves near the second island. The most fun route is left over a one-foot falls (not for rafts under 1700 CFS), then center thru a very narrow slot between islands. The far left channel is boring.
Mile 2.9
First Threat (class III). The river enters a boulder garden, then turns right into a deep hole along a rock outcropping on the left. The hole makes for a good hit, and is flippiest on the left, but can be mostly avoided by skirting right. Don’t fall out or you’ll get laughed at!
Mile 3.2
Second Threat (class II+). Almost immediately, the river drops again thru a slot along a rock outcropping on the right. Good swimmer's rapid with a large eddy below, making it easy to reach the rock outcropping for repeated swims.
Mile 3.3
Third Threat (class II-III depending). Make of this one what you will. The center is easy and unobstructed, but there are large holes on the far left halfway down, and on the far right near the bottom. Running both holes is an advanced maneuver. Lots of fun paddling to get a good line.
Mile 3.7
The Narrows (class II+). The river slaloms right to left, and enters a channel on the far left with many barely-submerged rocks. Rafts often get stuck here when crews do not paddle well.
Mile 4.0
Minigorge or Slusebox (class II+). The river enters a miniature gorge in bedrock, with pleasant waves and rapids. Fun and splashes.
Mile 4.3
Swimmer's Rapid (class II). A boulder bar rapid with big waves, this is a good place to practice throw bag techniques from the right bank. The Coloma quiet zone begins just below (no yelling, no water fights).
Mile 5.0
AWE & ARR Campground and cabins on left bank, good for 2-day trips.
Mile 5.1
Troublemaker Rapid (class IV-). The river enters a boulder garden, followed by a falls, with an S channel on the far left. The rapid's name describes your route well. At lower flows, the true path is narrow indeed. If you shade right, a large diagonal wave tends to flip rafts. If you go too far left, you end up in an eddy that is hard to exit. Precise placement of the raft into the gut of the hole surfs you next to a big rock on the left below, then thru a steep channel along Gunsight rock, where rafts often end up wrapped. In any case, the swim isn't too bad, but keep your feet up.
Mile 5.6
Private campground on right, then a steel bridge. River access should be legal, but is prohibited and enforced by the County. Put in at this campground or American Whitewater for the longest possible class II run.
Mile 5.8
Coloma Lake, a long stretch with slow-moving current. Take-out is prohibited; put-in access for non-commercial groups only, when doing the Coloma to Lotus run (class II).
Mile 7.2
Old Scary (class II-). This was formerly a class III rapid on the right shortly above the Highway 49 bridge, until high water detoured the river leftward during the winter of 1982.
Mile 7.4
Concrete bridge for Highway 49. Float under the bridge and relax in the sun. This is a popular put in site for most rafting companies lower gorge trips.
Mile 8.0
Henningsen-Lotus Park. This is the best stopping and starting point for breaking up this run into two sections.
Mile 8.5
Lotus Ledge. At low flows this makes a good surfing hole on the left, or can be avoided to the right.
Mile 9.0
Camp Lotus, the busiest camping spot on the American River. Usually full on summer weekends, so make reservations well in advance. Grass and tall sycamores make this a pleasant put-in spot.
Mile 9.1
Barking Dogs Honking Geese (class II+). Named after Camp Lotus neighbors. The river curves right and funnels into a nice hole, then turns left and proceeds past a huge rock-hole on the right.
Mile 10.6
Current Divider (class II+). A rock island divides the flow. The most fun route is to the right of the island, then left below. Believe it or not, if you do not paddle rafts often get wrapped here.
Mile 11.1
Highway Rapid (class II+). A long rock garden, very bony at low flows (under 1100 CFS). The best route is just to the left of a low brushy island, then slaloming around rocks until the slanting left-to-right exit.
Mile 11.4
Swimmer's Rapid (class II). Decaying estate on the left, willow bar on the right. Greenwood Creek enters on the right below, marking the end of the quiet zone. This would make an excellent take-out for the Coloma to Lotus run. Sometime makes a good lunch site under a massive shade tree.
Mile 11.6
Turtle Lake, a long stretch with slow-moving current, mercifully ended by…
Mile 11.9
Cable Car Rapid (class II) and other unnamed class II rapids. This is perhaps the best "wilderness'' camping spot on this river, with sandy beaches, oak trees, and few mosquito's. Class II and II+ rapids continue without too much flat water. Many rock formations in this area contain Indian grinding holes. Another lunch site that we use on our trips.
Mile 15.8
Fowler's Rock (class III). Entrance to the Gorge, occurs after the third sighting of the Lollipop tree on top of a distant hill. The river bends left around a gravel bar, then flows along a cliff on the left. Rafts are often accidentally parked on a submerged boulder along a house-sized rock on the right, but they can be avoided with a quick left slalom. Go right of Fowler's Rock, the tall cabin-sized boulder ahead, then pick a good slot (near center) in the diagonal boulder fence below.
Mile 15.1
Upper Haystack Canyon (class II+). Big standing waves in a narrow section of gorge. Not particularly difficult and a lot of fun.
Mile 16.7
Lost Hat (class III-). After a flat spot with cows and cow pies on both banks, the river drops steeply into some big standing waves. This rapid continues unabated into the one below. If you plan to sneak Satans's Cesspool, stay right; otherwise work left – but why sneak it!
Mile 16.9
Satans's Cesspool (class III+). Photographers are usually stationed at several spots nearby. An underwater rock cluster causes a hole and a large curling wave at low or moderate flows. A really fun rapid and one of the bigger hits in a raft, if you fall out then get back in the raft fast, or swim into the left hand eddy below, to avoid getting bruised in Son of Satan just ahead. A narrow rocky slot is available to the right of the central island.
Mile 16.95
Son of Satan (class III). The best route, whether in a raft or swimming, is just to the right of a submerged rock in the center, but without smashing into the right hand wall. If you’ve fallen out (rare) and swimming then swim with a high degree of motivation because the swim to the left of the submerged rock will probably kick your butt good. Hopefully your friends on the raft or another raft will help you and not just laugh at your expense.
Mile 17.4
Scissors (class III). After a short calm stretch, the river charges over some diagonal bedrock ledges, along the left wall, then around a cabin-sized rock on the right.
Mile 17.6
Lower Haystack Canyon (class II+). Big standing waves in a narrow section of gorge. A bit more difficult than the upper one and a lot of wetness.
Mile 18.2
Bouncing Rock (class III). Most of the current smashes into a rock on the right, then pours into a large flippy hole. Guides will often “bounce” the raft into the rock for giggles and nervous laughs.
Mile 18.4
Pre-Op (class III-). Big standing waves with rocks and holes along the banks.
Mile 18.6
Hospital Bar (class III). After a small boulder garden, most of the current drops right over a boulder bar into a fast channel along the right bank. A diagonal hole at the bottom is best run on the left, but you can ham it up for photographers by running further right, where a flip is possible. Named for a hospital tent set up during the gold rush. It’s a big fun wet hit.
Mile 18.8
Recovery Room (class III-). When the reservoir is down, the hole at the bottom is a miniature version of Hospital Bar. But when the reservoir is full, it is class II at most.
Mile 19.3
Surprise (class II-III depending). At the top of a wide gravel bar, the river bends left into a fast chute. Late in the summer, boaters get surprised as this rapid uncovers. You can sneak it on the right, or run over the big center rock into a hole, if you're brave.
Enter Folsom Lake.
This is typically where the Jet Ski pick syou up and tows out all the rafts in a long line. Gives you time to relax and avoids a 2 mile paddle in flat water with a headwind.
Mile 21
Take out at Salmon Falls and end your rafting adventure. Load rafts and jump in the shuttles for a 25 minute ride back to camp.